First Choice Marine Technical Group
|
|
NOTICE
OF MODIFICATION Number: 07-03-26 Saildrive Prop Nut
Locking (Issue 2) |
|
Written by
– MARTIN CHALLIS |
Date – 10TH April 2007 |
#Pages - 6 |
|
Approved by –
|
Yachts Affected
- Leopard 40 and 46 |
|
|
|
|
|
A NOM was issued on 10th November 2006 advising on a new prop nut for the Volvo saildrives.
Volvo officered this small hex nut to replace the cone nut which was coming loose and allowing the prop to fall off.
Volvo gave us the wrong information. This hex nut has been found to be unsuitable and should not be used.
The large diameter of cone nut is designed to support the propeller when going astern to prevent too much load coming on the rubber bushing in the prop. This hex nut is not big enough and only covers the center hub. It does not offer any support to the prop itself. Under high load in astern the prop can break loose from the rubber bushing and fall off leaving only the hub and hex nut still firmly attached to the shaft.
This Hex nut should not be used. If you have any stocks of these please talk to Lisa Martinez about returning them for a full credit.
The original problem with the cone nut which prompted Volvo to advise us to change to the hex nut was that the locking bolt in the back on the cone nut comes loose allowing the lock bolt, cone nut and prop to be lost.
Volvo and Yanmar both use the same prop and cone nut. We had the same problem with lost props some years ago on Yanmar saildrives so it was no surprise to me to see this also happen on the Volvos.
On those Yanmars we replaced the locking bolt with a locking stud and nut system which solved the problem 100%. Volvo has now authorized us to use this Yanmar locking stud on their saildrives without voiding the warranty.
This locking stud system is being fitted to all saildrives coming from R&C now. To prevent further lost props please ensure that it is fitted to all existing saildrives with fixed props as soon as possible.
Please
ensure this system is fitted to all saildrives at the earliest
|
This is the Yanmar pre-production drawing showing all the individual parts. |
The photo shows the Yanmar parts are required to make up a stud kit. They can be used on any Volvo or Yanmar saildrive with either Volvo or Yanmar cone nuts Stud bolt
- 196440-09150 Special
nut -196440-09180 These
parts are no longer available separately and now have to be purchased as a
kit complete with the cone nut as in the photo. Cone nut Kit – # 796420-09200 - $ 38.43 |

Yanmar SD20 and SD50 saildrives use a different cone nut but the locking stud is the same so you can buy either kit if you only need the stud and intend to use the existing Volvo cone nut.
Only the Yanmar SD20 cone nut will fit Volvo so you are best to buy #796420-09200
Yanmar SD20 saildrive cone nut kit – 796420-09200 (nut and lock stud usable on Volvo)
Yanmar SD50 saildrive cone nut kit - 796450-09200 (only lock stud usable on Volvo)
Make
it yourself and save some money.!
Before Yanmar introduced
this locking stud we were making them ourselves. Below are the instructions for making and
fitting it. If any base has trouble to
get the parts from Yanmar you will find this easy to do. If you have trouble to get the piece of SS
tube you can omit that part. You just
have to hacksaw a short piece off the end of the cone nut to remove the recess
and shorten the stud by a similar amount.
Then all you need is a length of 8mm threaded rods, some nuts and a tube
of Loctite. It will also save some money
doing it this way.
You will also be interested
to see the method used for the correct torque on the cone nut. I am afraid I cannot claim that idea as the
Yanmar engineers worked that one out
Martin Challis – December 2003
Stud system to lock the Yanmar Saildrive Cone Nut
Use instead of Yanmar lock bolt
Parts required
Ø 1 x Length of 8mm threaded bar cut 95 – 100mm long
Ø 1 x tube as spacer cut 10mm long
Ø 1 x 8mm washer
Ø 1 x nut (to lock stud to shaft
Ø 1 x 8mm nyloc nut
Ø Red (permanent) Loctite
Ø Blue loctite
Note
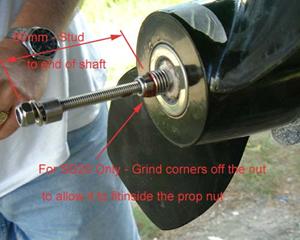
For the SD20 the nut used to lock the stud to the shaft is to big to fit inside the thread in the prop nut. It will be necessary to grind off the corners of the nut to allow it to fit inside the prop nut.
The thread is larger on the SD40/50 so the nut will fit without being ground
|
|
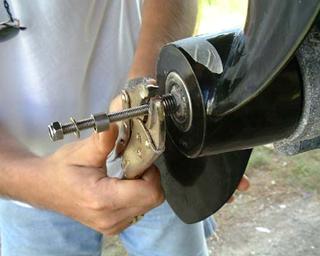
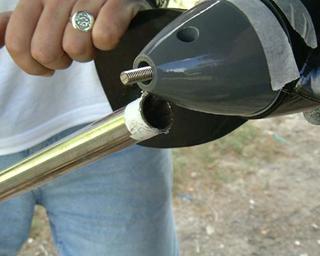
Screw the stud into the end of the shaft using permanent loctite Ensure the stud protrudes the correct distance - 80mm from the end of the shaft Fit the locknut and tighten hard against the end of the shaft For the SD20 it will ne necessary to grind off the corners of the nut |
|
|
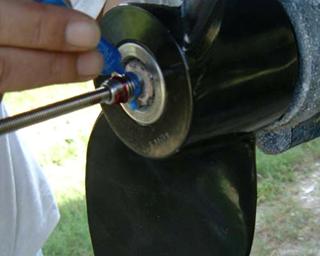
For the SD20 it is necessary to tighten the nut with vice-grips after grinding off the corners of the nut |
|
|
Apply Blue loctite to the prop nut threads |
|
|
Tighten the prop nut hand tight |
|
|
Mark the outside of the prop and prop nut with marks 12mm apart |

|
|
Tighten the prop nut until #1 mark on the nut is in line with the #2 mark on the prop. This corresponds to the correct torque as specified by Yanmar |

|
|
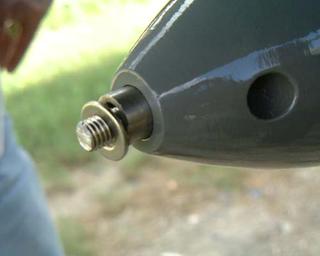
Fit the spacer into the recess that was intended for the original Yanmar lockbolt Fit the washer – This is necessary to ensure the nut does not turn if the prop nut backs off. |
|
|
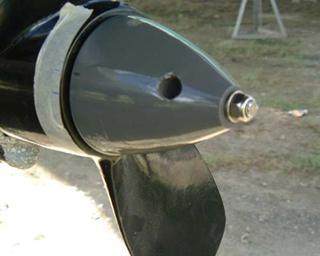
Fit the nylock nut and tighten. |
TESTS
If you want to check the effectiveness of this system proceed as follows
- Fit the prop nut and with the Yanmar lock bolt and tighten to Yanmar specifications
- Back off the prop nut and you will notice the lock-bolt also backs off with it. The prop nut will back off easily about 1/8 to 1/4 turn before the lockbolt appears to resist it.
- Like this it is easy to see how selecting ahead and astern in normal use will now turn the cone nut each way until the lock bolt and cone nut come completely loose.
Now fit the stud as above
- Back off the prop nut a few degrees and check the lock-nut does not turn with the it.
- The nut will not turn and the stud will prevent the nut backing off after just a few degrees.
- Do not backing off the nut more than a few degress as this could cause the stud to break
After this test DO NOT just retighten the cone nut and lock nut. Disassemble the prop nut to check all is sound before re assembly.
DISTRIBUTION:
CEO, CFO, VP Yacht Sales, VP Commercial, VP
Operations, CIO, VP Business Development, Director Customer Service, Regional
Directors, Technical Manager, Purchasing Manager, Yield Managers, Brand
Managers, Logistics Manager, Base Managers.